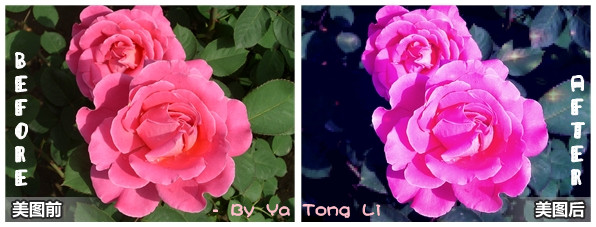
First Photo
 |
As I mentioned, I do like the original photo; however, the color of the leaves and ground is a little dark which shadowed the brightness of the flowers, and also, the messy leaves decrease the visual attractiveness of the flowers.
The saturation of the color refers to the purity of the color, the higher the purity is, the more clear-cut the picture is; conversely, low purity indicates a darken expression. The saturation of the color is determined by how much the color is mixed with gray and white. I increased the saturation of the color to make the flower clearer and brighter.
2. Adjust sharpness
Use sharpening to increase the sharpness and clarity of the picture.
3. Use mosaic brush
Decrease the intensity of the mosaic brush to blur the leaves around the flower so that leaves won’t take focus away from the main subject – flower.
 |
Sunlight + Cold Tone
|
_%E5%89%AF%E6%9C%AC.jpg)
 |
| Starlight + Cold Purple Tone |
_%E5%89%AF%E6%9C%AC.jpg)
 |
| Chromatic Glint – Unrealistic effect |
_%E5%89%AF%E6%9C%AC.jpg)
 |
| -- Edit Show (Different Special Effects of Editing) |
Second Photo

This is a photo of my boyfriend.
It was taken in a KTV so that the background of the photo looks messy, and the color of the background unmatch the color of his cloth, which really reduce the attractiveness of the main character. The uneven shadows created by lighting mix with the dark cycle around his eyes made his expression looks weird. According to the analysis, I decided to remove the entire background and do a little modification.
1. Beautify the features
Use skin whitening function to reduce uneven darkness or shadow caused by lighting. Then use remove black circle function to smooth away dark eye circles.
2. Figure adjustment
3. Cutout filter
Use cutout filter to cut the person out of the photo.
 |
| Poster |
_%E5%89%AF%E6%9C%AC.jpg)
 |
| Realistic Scene |
 |
| Other Scene |
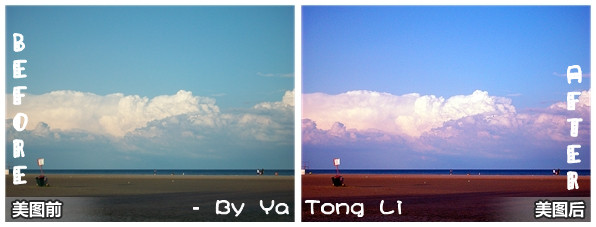
Third Photo

Beach of the Lake of Ontario
As far as I am concerned, the original photo is already a really good picture. However, there are severl steps can be done to make it even better, or, to make it different.
To reduce the hazy feeling of the photo; make the photo brighter and clearer.
2. Defogging: Use the defogging function to increasing brightness and contrast ratio.
3. Increase sharpness again after defogging to give a 3D felling to clouds.
4. Adjust color: add red, purpol, and blue to give the photo a mysterious feeling.
 |
| After Edited |
_%E5%89%AF%E6%9C%AC.jpg)
Thanks for viewing!
Note: All photos are edited by Ya Tong Li using photo editor MeiTuXiuXiu http://xiuxiu.meitu.com/
